Very Recent Posts

Thursday 7 April 2016

HDD Bad Sector Repair

HDD Bad Sector Repair

Hello. Guyzz how are you ? I think is very well by grace by God.
Today I want to discuss about how to repair bad sector using a software (HDD Utility).
I was discuss about What is bad sector ? I also discuss about how to repair bad sector without any software. If you don’t see our previous post so Click Here to Learn What is bad sector and Click Here for learn about How to remove or repair bad sector without any software.

Today we will learn How to Repair bad sector using a simple software.
Now I will show you how is possible with pictures.

At first download a software from here . Or search it in google and download it . The software name is HDD Regenerator 1.71 .

If you want to repair your hard disk using this software so you have need the software serial key or Buy it full/premium version .If you do not download this software full version , so you can’t repair bad sector.
If you don’t have any credit card or online Bank account you can’t buy this software and do not repair bad sector. So
If you downloaded  the software successfully so you have need to install it in your computer.

How to install it?   
This software installation is very difficult . So please follow our easy steps to setup this software successfully.
At first double click on the software
See details in picture


Now setup it like other software’s . But a simple change
See in the picture below what is change….

You need just deselect it.
Next step :
Now click on Patch . See details below

When you click on Patch , then you see a Dialogue box or message box.
Like it below ..
And Double  click on selected icon . When you double click on this you can get a message “File patch successfully”


You can get a dialogue box again likewise upward photo and do same work.
Don’t worry you can see the dialogue box in three times.
When your “Patch” have been successfully then you have need to setup serial key for full version.
How can I register with serial key and where you get this serial key ?
See details here in this picture.
At first open HDD Regenerator from desktop or programs.
You can see

If you do not register it you can do only one sector generate .


Then you get a option and copy the serial number and paste here
Like this picture.

When you register this software you can get a notification and you  able to repair all bad sector easily.
How to repair ….
At first open the “HDD Regenerator” from your desktop or programs.
When you open this software you can see like this picture.
And click on “Click Here to repair physical bad sector on damaged drive surface directly under windows (XP/Vista)”like to the picture.

When you click there this time you can get a menu and do work like this picture.
And double click on you hard disk

After clicking on your hard disk so you can see a new window from “HDD Regenerator”
You can see many options .
If you want to repair bad sector so please select 1. Scan and repair” like the picture in below.

When you give your command 1 scan and repair you can get a new window .
This time you need to press “M” and then press “Enter” button .If you complete all steps successfully so you can see your hard disk scaning . Now you can see a new window like below .


You have need to long time to complete the process. When this software found any bad sector you need to press “Enter” Button or follow this window’s instructions.
 If your Hard disk contain many bad sector so you need to long time to complete this step. I think you need to 2-3 hours to complete the process. When complete this process successfully you need to restart you computer.

When you open your computer this time you can see !!! your computer is working very fast !!!!!

Stay with us to get many useful tips or tricks.


At last a request to you if you like this post so please write your comments and don’t forget to share this post on your friends circle.

Tuesday 5 April 2016

Delete Virus Using Winrar

Delete Virus Using Winrar

How to delete virus using WinRAR ?
Everybody know viruses is risky for any computer. If we do no take necessary steps to protect for viruses, so viruses can get chance to attack in your computer.

I think this post is very important and helpful for everybody. In this post we can learn how to delete any harmful viruses without any antivirus. Just using a simple software for delete any kinds of harmful viruses.

I called that we can delete any viruses without any antivirus just using a simple software. This software is so simple. We use this software for many time and many works. Software size is too small. So I just called it “Simple Software”. But this software’s works is unbelievable!!!

In this post we can learn about this software unbelievable works .If you don’t have this software so please download this software first. You can use google search for download this software. When your download is ready, now install it. If you have this software so now install it .When this software is installed in your computer, now open it and follow these steps below.

When this software installed complete or already installed in your computer you have need to open this software.

1st steps: At first open this software from all programs file or Desktop icon. Then follow               next steps>>>>>>>

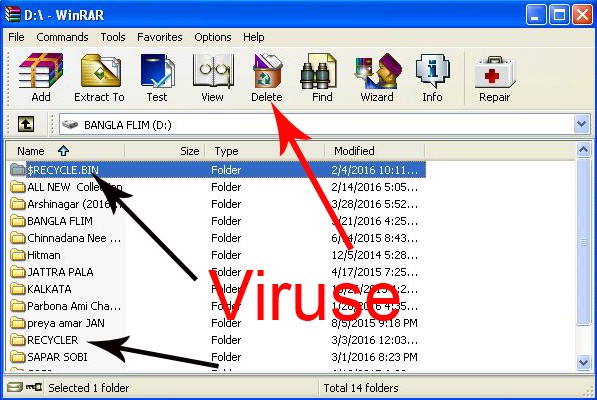
2nd steps: When you open this software you can see a window like this picture.
               You can see many options in this software. File, Commands, Tools, Favorites,
                Options and help menu in this Winrar Toolbar .You can see seven others                options below in the toolbar. This is “Add, Extract To, Test, View, Delete,                Find, Wizard, Info, Repair” options below in the toolbar menu.
               We can use this all options for many ways. We can do archive, Zip, Unzip etc                    using this Winrar Software.
               You can see C:\Documents and Settings\user it is set by windows default. You                can change easily this folder or Drives locations. If you get any notification                from any virus in any drives .So you can select this Hard drive or Partitions                click on this C:\Documents and Settings\user ^^^^^^^^
                        Now follow next steps for delete viruses easily.

3rd Steps: If you know which Drive or partitions are affected by harmful viruses now select this drive like this picture >>>>>>
If you click on this options follow by the picture , you can get a pop up menu.  This pop up menu help us to show all drive or partitions in this software .Now select your viruses affected drives or folders. Now follow next steps.

4th and final steps: This steps is very important for delete any viruses easily. So see this steps very carefully. When you click or selected your viruses affected drives or folders you can inter your selected drives. Ex: D drive. Now you can see viruses in your selected drive. This time you have need to delete the viruses .

How can I delete this viruses?
It is very easy. At first select all viruses and press “Delete” button from your keyboard or click on “delete” options from this software’s menu. This time you able to delete all software easily.

No more today! Thanks to read this post.


Sunday 3 April 2016

Trun Off Auto Play Easily

Trun Off Auto Play Easily

How to turn off  auto play EASILY

Auto play is a program in any kinds of operating system. When you insert Memory Card or pen Drive on your computer you can see the auto play. It is a helpful program in our computer .But some time any viruses get chance to inter in our computer fro this auto play.

When you insert any kinds of portable device like , Memory card, pen Drive, or any kinds of VCD/CD/DVD you can see your computer is want to scan your computer. But auto play can’t delete or remove any viruses from any kinds of portable storage or drives.

Many time the Auto Play Waste our time. When Auto Play running on your computer you can see your computer is working very slow!! If you insert your Memory card on your computer then you look automatically a program is run on your computer .This program do not give permission to work any program easily.
                                

So Auto Play is very bad program in our computer.

We can turn off the Auto Play easily. No need to learn any programming language. We can stop this without any Programming language. How can it possible?

It is possible!!! If want to protect this problem, so please follow our easy tips for Auto Play easily.

Let us come to the main point.

1st steps: At first go to “Run” menu. You can get “run” menu by these steps>>> Click on “Start” menu>> then you can get “Run” option , so now click on “run”. Or press “Windows key+R” to get the “Run” menu easily. When you get the run menu, now type following words>>>> “GPEDIT.MSC” (Without The Quote) and hit “Enter” button or click on “Ok” for next steps.

2nd Steps: When you type “GPEDIT.MSC” (Without The Quote) and hit “Enter” button or click on “Ok” , you can get a new window or menu. This is “Group Policy” menu.. Now click on “User Configuration” and follow the next steps.

3rd Steps: When you click on “User Configuration” option this time you get other three options .These is “Software settings, Windows Settings, Administrative Templates”. Now we have need to click on “Administrative Templates” for turn off Auto play!

4th steps : When you select “Administrative Templates” you can see seven other options.  
  • Windows Components
  • Start menu and Taskbar
  • Desktop
  • Control Panel
  • Shared Document
  • Network
  • System

This is all options under the “Administrative Templates” options. This time we just need to click on “System” option. Now follow the next steps.

5th steps: If you click on  “System” option so you can see many options. Now click on “User Configuration” and follow the next steps.

3rd Steps: When you click on “User Configuration” option this time you get other three options .These is “Software settings, Windows Settings, Administrative Templates”. Now we have need to click on “Administrative Templates” for turn off Auto play!

4th steps: When you select “Administrative Templates” you can see seven other options.  
  • Windows Components
  • Start menu and Taskbar
  • Desktop
  • Control Panel
  • Shared Document
  • Network
  • System

This is all options under the “Administrative Templates” options. This time we just need to click on “System” option. Now follow the next steps.

5th steps: If you click on  “System” option so you can see many options. Please double click on turn off auto play under from the “system” menu. When you click on “turn off auto play “ you can get a new dialogue box. Now you can see “turn off auto play properties” This menu help us to solve this problem.


6th and final steps: When you click on turn off auto play you can see the auto play is enabled by windows default. If you want to free from the auto play so select on “Disable” options and click on apply and ok. Then refresh your computer.

Our all steps are complete! Now insert any portable device on your computer.
Wow!!!! We are successful!!! We couldn’t see the “auto Play”.

If you want to enable the auto play again, so follow these all steps and change only one option on the “6th Steps”. Where you select on “disable” replace “Enable” for turn on auto play.


So dear reader if you like our post or if you feel this post is helpful or important, so please leave a comment and don’t forget to share . :-p 
How to make bootable Pen Drive

How to make bootable Pen Drive

How to make bootable Pen Drive ?

Welcome everybody to our new post. Today I want to discuss about a very important tips. This is a very important tips for every computer user. In this post we can learn how to make a pen drive bootable. Thus is very hard tricks .If you follow our steps very carefully so you can do it very easily.

Why need to make bootable pen drive?
Nowadays computer is a very popular electronic machine. We can do any work using the computer. But we know that computer is a operating system make our life more reliable.
Everybody know our computer or laptops is working for operating system. The operating system is life for any computer. Without installed any operating system you can’t run or open your computer. So operating system is very important parts of computer or laptops.
Without any operating system you can’t do any work using the computer.

How to setup or install operating system?
We learned that operating system is a very important parts of any computer. When you want to do any work using computer so you have need to install operating system. Every computer have a CD/DVD writer. We can use this writer for any kinds for copy writing. We also setup operating system using the CD/DVD writer very easily. But some of people can’t buy the CD/DVD writer for highly rates. Suppose, you have buy a computer but you have forget to buy the CD/DVD writer. So how to you setup the most important things computer, operating system?

This post is very essential for this people, they use computer but there haven’t any CD/DVD writer.

So please follow our easy steps for setup operating system without any CD/DVD writer.

At first download a simple software. This software name is WinSetupFromUSB_0-2-3.exe .  This software size is too small but his work is unbelievable!!! You can make your Memory card or pen Drive bootable very easily. So please download this software using google search engine.
When your download is ready unzip the software, then setup this software . When this software installation is complete, now insert your memory card or pen Drive (About 4GB) in your computer.

Now follow some easy steps with picture.

1st steps: At first open this installed WinSetupFromUSB_0-2-3.exe software.
            You can see this software window like the picture and click on “RMPrepUSB” options under the “Format USB Disk” Menu. Like this picture>>>>>>>>>>>>>


2nd steps: When you click on “RMPrepUSB” options under the “Format USB Disk” you             can see other window. Now you have need to change some settings. At first select            “NTFS”. If you want to make your Pen drive bootable so you have need to format        this memory card in “NTFS” format. Then select on “Boot as HDD”. Now you need       to select or enable “WinPE/Vista V2 bootable [BOOTTMGR]. But you can also       select “Xp Bootable (NTLRD)” for your choice. If you want to erase your all data       from your memory card or pen drive you need to select “Clean USB Drive [Erase       USB Drive Partitions] for delete any viruses from your memory card. We are discuss          about Bootable Memory card or Pen Drive. So you have need to select on      “WinPE/Vista V2 bootable [BOOTTMGR]. When you finished all steps now need to        click on “ Prepare Drive”.
       When you click on “ Prepare Drive” you can see your command is working.
For more details see the picture in below >>>>>>>


When your memory card or pen Drive is successfully prepared, you can see the main Window. Now need to some change on the WinSetupFromUSB_0-2-3.exe software.
           
3rd & Final Steps:
This steps you have need to change some setting.
This window you have need to enable "Copy Setup Boot/RC files only" and then click on go.
Now you have need to wait some time for complete the task.
Then follow the next steps.>>>>>
This step is very important. In this steps you have need to copy all data from system disk. You can also download the operating system software form internet. When your download is ready now copy all operating system file in your Memory Card or Pen Drive. Then restart your computer and continue press “Del or F10” button.
When you press these button this time you can see many options. Now select your memory card or pen drive for install operating system.

Now install your operating system. Next post I will discuss about how to setup any operating system easily.

You can see details here


Wednesday 23 March 2016

  How To Access Your Chrome Passwords Remotely From Any Browser

How To Access Your Chrome Passwords Remotely From Any Browser


Google has introduced a new online feature where a user can sync its passwords to Google and access Chrome passwords from any browser. But to access this feature, you will need to sync your Chrome password first.


Most of the times, even if we have many browsers installed on our PC, we still use only one of them. Since it’s launch, Google Chrome has become one of the favorite browsers of the internet users. Using only one browser, most of the times, make us also store our passwords at the same place.
However, in certain situations, if you still want to use the Google Chrome passwords from any browser, here are the steps on-


How to access Chrome Passwords from any browser:

You need to use Google Passwords through which Google will keep all your Chrome passwords with it on a specific URL and you can access Chrome passwords from there. So, follow the following steps to activate Google Chrome password service:
  • Go to Chrome ‘Settings
  • Sign into Chrome
  • Click ‘Advanced Sync Settings
  • Select ‘Encrypt synced passwords with your Google credentials


And now, wait for a few minutes for the data and password to get synced online.

Access Chrome Passwords from any browser Now:

  • Once you are already signed in, you can see all of your passwords.


Did you find this helpful? Let us know if you are aware of any other Chrome tricks and tips in the comments below.

How To Get The Best Wi-Fi Signal In Your House

How To Get The Best Wi-Fi Signal In Your House


If you want to increase your Wi-Fi speed, the first criteria would be to get the best Wi-Fi signal. There is no way out where you can leverage your Wi-Fi data without getting the best Wi-Fi signal with a good strength. fossbBytes has come up with an article covering all the aspects of getting the best Wi-Fi signal by telling you how interference, Wi-Fi channel, the line of sight etc. matters.


Getting the best Wi-Fi signal in your own house is like finding a solution to come out of the maze while being stuck in the maze. We take our Wi-Fi router for granted and we just place it anywhere knowing that all of us are getting the internet connection.
Since we are all paying for the data usage, it’s our right to utilize the Wi-Fi to its fullest which we ignore because we take life as it comes. So, we have come up with some tricks and tweaks on how can we get the best Wi-Fi signal in our house.

How to Get the Best Wi-Fi signal in your house:

  • Put the Wi-Fi router ideally in the central location of the house as a Wi-Fi router extends the Wi-Fi signal in every direction.
  • Avoid keeping the Wi-Fi router in one of the corners of your house because more than half of our Wi-Fi signals are ended up providing connections in the neighborhood.
  • If your data port lies on one of the corners of the house then consider running a long ethernet cable to the center of the house, it does not cost much.
  • Remember, any solid structure like a wooden wall or a concrete wall are impediments to the Wi-Fi signal.
  • Do not forget the Wi-Fi antenna. They have some serious effect on the quality of the signal you receive. If you have not one, better buy one to get more coverage and stronger signal.
  • You can use a plenty of apps available out there for free of cost to measure your Wi-Fi signal strength. This way, you can easily decide the perfect or at least, close-to-perfect location for your Wi-Fi router.
we have covered some of the important points on how a Phd scholar named Jason cole derived some results on the Wi-Fi signals on a mathematical modeling mapping of his flat and here are some of the results:
  • Wi-Fi router should be kept in line-of-sight to your device to get a strong Wi-Fi signal.
  • Dark spots are the points in our room where Wi-Fi signals get canceled out after reflection. So if you are not getting a good signal at a particular location, try switching your position a little bit. Here is the video explaining that: 
  • Many materials absorb a quite bit of the signals and a concrete wall absorbs the most.
  • Some of the things which should be avoided when planning to keep a Wi-Fi router nearby are:
    • Concrete wall
    • Water body like an aquarium, the little fountain, microwave etc.
  • A vertical antenna position helps make a better in horizontal space and Vice versa to get the best Wi-Fi signal.
Besides, the above observations which are mostly based on the physical locations of placing a Wi-Fi router, there are some other technical tweaks which help you improve your Wi-Fi router’s performance. Some of the tricks to get a strong Wi-Fi signal are:
  • Update router firmware
  • Choose correct wifi channel
  • Disconnect old devices from Wi-Fi router
  • Replace antenna
  • Restarting your router etc.

How to choose the best channel for your Wi-Fi router?

These days every other house has their personal Wi-Fi routers. These intelligent routers have the capability of choosing the best channel for a better performance but sometimes, that does not work as the perfect solution.  This article talks about the different channels, their frequency range, co-channel, channel interference and also running some diagnostics test on Mac and Windows to find the right channel for you.
I hope this article on how to get the best Wi-Fi signal in your house has been informative as it talks about all the aspects of a Wi-Fi.

WiFi router like interference, channel etc. If you are also aware of some tricks which are capable of boosting the Wi-Fi and getting us a strong Wi-Fi signal, kindly share that in the comments below.

Tuesday 22 March 2016

How To Get Android N Preview Right Now On Your Phone — Android 7.0 Nutella

How To Get Android N Preview Right Now On Your Phone — Android 7.0 Nutella


Google has just announced the release of Android N Developer Preview program. It allows you to get the Android N (I’m calling it Android Nutella) over-the-air updates. In this article, I’ll be telling you how to get Android N Preview right now on your phone. Read more to know about the new features and get the preview on your device.
Out of nowhere, Google announced the release of Android N(utella) Developer Preview today (Yes, we are betting heavy on Android Nutella). It was expected that Google would release the very first Android N Preview around its I/O developer conference in May, but the company decided to surprise everyone.

Android N Developer Preview is the earliest preview yet

Through a Medium post (sorry, Blogspot), Hiroshi Lockeimer, Google’s SVP for Android, Chrome OS and Chromecast, told the world that the Android team wished to release the preview earlier than ever to gather more data from developers and improve the final product.
He said that this will also ensure that Google will be able to prepare for the final release to the OEMs later this summer. With this extra time, developers will be able to bring Android N support to all their apps and OEMs will be able to spread the new sweet delicacy easily.

Android N Preview available over-the-air

To make the testing process hassle free, Google has made the preview available as an over-the-air update. This means that you won’t have to flash a freshROM and wipe the entire device — just like Apple’s beta program.
This means that developers will be able to install the Android N Preview on their phones just like the regular phone updates from their carrier. However, Google states that the preview is not meant for everyone and people should install it on their secondary devices. A consumer preview will be available for download as Android N gets closer to its final release.

Biggest changes and features in Android N Preview

  • Multi-window support
  • Quick Settings Tile API
  • Notification enhancements
  • Data Saver
  • Android TV recording
  • ICU4J APIs
  • Support for more languages
  • Accessibility enhancement
  • Number blocking
  • Call screening
  • Direct boot
  • Key Attestation
  • Network Security Config
  • APK signature scheme v2
  • Scoped directory access
  • Default Trusted Certificate Authority
  • Doze on the go
  • Android for Work update
    • Always-on VPN
    • Work profile security challenge
    • OR Code Provisioning
    • Toggle Work Mode
    • Disable access to apps
    • Remote Reboot
    • Enterprise Process Logging
    • Remote Bug Reports
    • Device health monitoring
    • Certificate management

How to get Android N Preview right now and install it on your device?

Method 1: Android N OTA update

The company has launched its Android Beta Program to deliver the updates over the air. Starting today, you can update your devices — Nexus 6, Nexus 5X, Nexus 6P, Nexus Player, Nexus 9, and Pixel C — via OTA updates.
For getting OTA Android N updates and enrolling your Android device, visit the Android Beta Program website.
Note that if you enroll in the program and later choose to opt-out of receiving the updates, all the user data will be removed.

Method 2: Android N Image Download

If you wish to download the Android N Developer Images and install it manually, you can get them via following links and control the updates yourself.
With this method to get Android N Preview, all data from your device will be removed. So, you are advised to make a backup of your user data. Note that using this method, your phone won’t receive additional OTA updates and you’ll have to install future previews manually.

Android N Preview images download link:

How to install Android N Preview images?

You can follow the detailed instructions here on developers.google.com/android and install Android N on your device. The same page also tells the instructions about how to uninstall Android N Preview from your device.

What will be Android N’s name — Android Nutella?

We believe that it would be “Android Nutella” this time around, because here’s Lockheimer dropped another hint at the end of his Medium post:
So, the burning question that’s on everyone’s mind: what will the N release be named? We’re nut tellin’ you yet.